

Sunday, November 20, 2011
HCBC Day 10
It's now down to the final day of boot camp, and I've ended with a card inspired by Lisa Spangler's sparkling holiday card.
 This was an interesting experience for me, but a bit disappointing too. The photo cards seemed to be the focus and the cards with gift cards, which I will probably never use, however, the sketch/design could be used for other cards I guess. I would have preferred more reproducible holiday cards and some other techniques instead. Another thing was the poor videos during the second week ... ten minutes took four times as long to view and was annoying with it's stopping every few seconds and restarting. Still, I did learn a few new things and have these designs to adapt for other cards later.
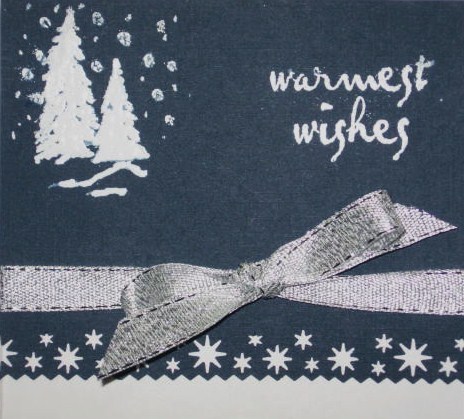
HCBC Day 9
Continuing to catch up, Day 9 had examples of cards with gift cards, and I wanted to try Kristina's idea on how to create a slit within the 4-l/4 sq. card to hold a gift card, which was clever. My card front turned out to be "warm wishes" and tiney pine trees heat embossed in white on navy cardstock.

HCBC Day 8
I really need to catch up here with the class sessions, and am finally up to #8 which featured some new techniques. I was inspired by Debbie Olson's card and Copic coloring instructions and used a fun stamped image sent to me by someone last year. I colored the cute little snowball figures with Copics and used matching papers to put it together for a happy little card.


Friday, November 18, 2011
HCBC Day 7
During this class, Jennifer presented another photo card, creating a collage of photos into a bookmark attached to a card front. I wanted to try making the bookmark, but instead of photos I used some Disney characters cut out of a Disney paper full of them and adhered them to a cardstock strip then inserted it into a slit on the card front to hold it in place.


Wednesday, November 16, 2011
HCBC Day 6
Three sketches were presented, and I chose to follow Kristina's Merry Bright card, but made a simpler version with supplies on hand.

Sunday, November 13, 2011
HCBC Day 5
This was my favorite session .... reproducible cards.... just what I need.
I started with the Peace card embossed on blue base, embellished with white ribbon, a snowflake and bling, and sentiment to finish.

I started with the Peace card embossed on blue base, embellished with white ribbon, a snowflake and bling, and sentiment to finish.

HCBC Day 4
Cards with newsletters were featured this day, but since I rarely send them anymore, here's my take on the tree newsletter card. I liked the white heat embossing idea on a dark blue cardstock...clean and simple.


HCBC Day 3
Here's my version of the Merry Christmas card without the faux letterpress heat embossing technique featured by Jennifer on Day 3. I just embossed a white base with a Cuttlebug snowflake folder, and cut out the circle beneath which I placed a winter scene stamped image that I colored with Copics. This was adhered to a dark red notecard, and the sentiment stamped in white onto a red strip just below the circle. I'll have to try the new technique at another time.

Saturday, November 12, 2011
HCBC Day 2
Day 2 of the Holiday Card Boot Camp featured cards with photos, but since I don't send photo cards, I thought I'd use a stamped image of a nativity scene in place of a photo. Followed the Christmas cheer card somewhat, but instead heat embossed a "Joy" sentiment with gold across the bottom of the image and linked it up with a swirly snowflake at the end.


Thursday, November 10, 2011
Holiday Card Boot Camp
When I heard about the online card class with Jennifer McGuire, I just had to sign up for it. I need all the help I can get to learn new techniques and ideas for creating my own cards. It's my first online class, but from the start I can see it's well planned and thorough in presenting everything clearly. I'll have to take my time absorbing all this new information so I don't expect to keep up with posting cards in the gallery, but it's good to know that it's okay as I'll have access to it forever.
So for the next two weeks there are daily online classes, with videos and instructions to make holiday cards, and this may get me started on doing some of my own for Christmas. I'll be sharing them here as I attempt to case the designs, but they'll most certainly be different since my supplies are meagre and I can't duplicate the techniques. However, I can adjust and adapt by using what I do have on hand. Here's my attempt from Day 1.
 I didn't have the diecut ornament, so had to print out the file onto cardstock, then cut it out as a template. Love this Coredinations Pearlized cardstock for the base and the blue shimmer paper worked well with it. I cut out the ornament from the same gold paper, but instead of the snowflake design, I added some sapphire blings down the center, and tied the top with gold tinsel cord. Sorry that the blue"Joy" sentiment isn't too visible on the gold in the photo, but the Martha Stewart border punch picks up the blue beneath it which added a nice accent. Do like this card and may create a few more like it, or adapt the design for other occasions.
Thanks for visiting and leaving your comments for me.
Subscribe to:
Posts (Atom)